
Queen's Domain Wind Dash: Unlocks and Wind Gem Guide
Master Queen's Domain wind dash with the Holy Sword Endu, find early Wind Gems, and unlock double and triple air dashes to explore the isle's hidden paths.
Jump to
How to Unlock Wind Dash
That broken bridge becomes a route forward once you unlock Queen's Domain wind dash. Claim the Holy Sword Endu after defeating the Shrine Guardian to gain your initial aerial dash. Additional Wind Gems give you more charges, opening longer crossings and elevated paths throughout the island.
Getting the sword requires a short loop through the starting area's underground dungeon:
- Collect the Dagger Belt near the coastal islands. Equip it to gain rechargeable Throwing Daggers.
- Follow the coastal route into the lower valley. Use a dagger to activate the diamond-shaped switch beside the underground dungeon entrance.
- Explore the dungeon and collect the Endu Shrine Gate Key. The Wooden Club is also inside, in a chest on an earlier floor.
- Take the elevator back to the surface. Return to the nearby Crystal Monument to rest and save before the boss.
- Unlock Endu Shrine and defeat the Shrine Guardian. Keep clear of its overhead strike, which reaches farther than its other attacks. Use the Wooden Club to exploit its weakness to Impact damage.
- Collect the Holy Sword Endu beyond the guardian.
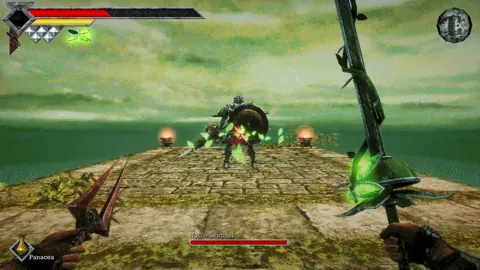
The sword already contains a Wind Gem. A diamond beneath the yellow Power Meter shows your available dash charge.
Official page: Queen's Domain (store.steampowered.com)
How Air Dashes and Charges Work
Jump toward your destination, then activate Wind Dash while airborne. Once you have additional Wind Gems, you can dash again during the same crossing.

Each dash spends one diamond on the Wind Dash Meter. Those charges replenish over time, so check the meter before committing to a wide gap. Unlocking two charges only helps when both are available.
You can use the ability even while another weapon is equipped. Keep using the melee weapon that suits the enemy instead of switching to Endu before every evasive dash.
Watch these two restrictions:
- Holding a charged melee attack prevents Wind Dashing. Release the charged attack before attempting a crossing.
- Dashing can drain the Power Meter. After landing beside enemies, let the yellow meter recover before swinging for damage.
Practice on a short crossing before tackling a longer one. Choose a clear landing point, jump from suitable high ground, and check that your charges have recovered before trying again.
Second Wind Gem Location: Cemetery Precipice
Your next traversal upgrade is near the Cemetery Precipice Crystal Monument. This gem adds a second charge, letting you chain two aerial dashes.
From the starting Crystal Monument, take the uphill route and use your initial dash to cross the gap into the higher area. Continue uphill toward Cemetery Precipice, then cross to its Crystal Monument.
From that save point:
- Face north and walk toward the graves near the cliff.
- Turn east and follow the wall. Look for the place where the raised path slopes down toward a tree and rubble.
- Climb the rubble onto the upper road.
- Follow the road north, clearing the enemies along it.
- At the road's end, turn west. Look for the diamond-shaped pickup in a small tower.
- Jump and dash onto the broken tower to the right. Use its rubble to jump across to the small tower holding the gem.
Picking up the Wind Gem adds another diamond to your HUD.
Before leaving, face west toward the taller tower. Your two dashes can now carry you onto its upper platform. Follow the platform to the right for Roasted Poultry, which permanently increases your health, and collect the Meal Ticket beneath it.
Save again at Cemetery Precipice before taking the longer routes this upgrade opens.
Where to Go With Two Air Dashes
Two charges open both the route toward Obmuer Temple and useful detours around the starting island.

Collect the Azure Torch
Visit the entrance to the Tower of Knowledge across the broken bridge near Endu Shrine. Collect the Azure Torch beside the doorway.
The tower stays sealed until you light three gargoyle beacons, but you can take the torch before opening it. Its rechargeable fireballs also give you another ranged attack.
Reach the Broken Staircase Beacon
Return to the raised road used to reach the second Wind Gem. Follow the southeastern path past a blue lantern, then face north toward the broken staircase.
Chain two aerial dashes to reach the stairs. Three Skeletal Fighters wait above, so clear them before approaching the gargoyle. Equip the Azure Torch and strike its mouth to light the beacon.
Cross Toward Obmuer Temple
Return to the Knight's Encampment Crystal Monument near the beginning of the game. Go up the nearby stairs and pass the left side of the broken tower.
Head southwest to the broken bridge. Use two dashes to cross, then continue to the Crystal Monument at Aganmi's Camp outside Obmuer Temple.
Entering the temple requires four triangular slates scattered through the surrounding water area. One sits on a large broken platform or column in the middle of the area, reachable by air dash.
Third Wind Gem Location: Obmuer Temple
Inside Obmuer Temple, the next Wind Gem raises your capacity to three aerial dashes.
Follow the dungeon's route until you reach its second save point:
- Collect the first Trident Key in the watery area near the entrance after dropping down.
- Use that key to continue to the second save point.
- Look into the large pit nearby. Dash into the opening in the wall below.
- Explore the area containing the second Trident Key, where skeletons ambush you. The third Wind Gem is also in this area.
- Return to the large pit near the save point. Use your three available dashes to cross it.
Keep the temple's key puzzles separate from your search for the movement upgrade. There are two Trident Keys inside the temple, while the additional keys used for optional treasure come from elsewhere. Searching every corner for four temple keys will stall your route unnecessarily.
Revisit Ledges After Each Upgrade
Extra charges change which parts of familiar scenery you can reach. Broken columns, upper walkways, and platforms across water can become paths once you have another dash available.
Prioritize detours with visible rewards:
- Food platters: Broiled Meat permanently increases Attack Power, while Roasted Poultry permanently increases health. Collect the Meal Ticket underneath each meal.
- Broken towers: An early tilted tower near the Tower of Knowledge contains a Travel Crystal Fragment in a crate.
- Elevated routes: Follow connected pillars and ruined stairways to find paths around ground-level obstacles.
Save manually after collecting a Wind Gem or finishing a valuable detour. Crystal Monuments do not automatically preserve your progress, and dying returns you to your most recent save.
Wind Dash vs. the Demo's Sword-Lunge Trick
The demo's Rusted Short Sword movement trick uses a tightly timed jump after a lunge to carry momentum. Endu's aerial dash is a separate ability and does not require that lunge-jump timing.
If you are following an older movement discussion, check which weapon it describes before practicing the technique. For normal progression, focus on obtaining Endu and collecting Wind Gems.
When a crossing still fails, check your available diamonds, release any held charged attack, and look for a higher takeoff point. If the destination remains beyond your current dash range, continue exploring for the next Wind Gem and return with another charge.
Continue with
 Queen's Domain All Hidden Passage Guide: Early SecretsQueen's Domain all hidden passage guide: find three secret walls, collect Pandora's sword, and unlock overlooked routes through the Tower of Knowledge.
More in Exploration
Queen's Domain Exploration Guide: Unlock Every Route
Use this Queen's Domain exploration guide to find Endu, unlock Wind Dashes, collect permanent upgrades, and reach Obmuer Temple without losing progress.
Queen's Domain Map Guide: Routes, Keys, and Shortcuts
Navigate Queen's Domain map with routes to Endu, Wind Gems, Obmuer Temple, and the Tower of Knowledge, plus shortcuts and fast travel tips for exploration.
Queen's Domain Shop Location: Unlock the Duck Merchant
Find the Queen's Domain shop location, unlock Umbada's Trading Outpost with the Stone Duck Figurine, and learn what to buy with your early Ancient Coins.
Queen's Domain Sword Jump: Wind Dash and Demo Timing
Learn the Queen's Domain sword jump, unlock Wind Dash, find the second Wind Gem, and understand the demo lunge trick before tackling much longer gaps.
Join the community
Official channels for news, updates and player help: